Installing a Fishfinder, Vaseline Method
Having installed the Humminbird Fishfinder 535 on the Project Caper and being very pleased with its performance, we have decided to fit the Humminbird Fishfinder 565 Dual Beam on Project Prowler.
This will enable us to get a better view of the sea bed when paddling shallow ground. We have also decided to use a different method to fit the transducer, making it less permanent and allowing us to compare the difference, if any, between the two methods.
Positioning of the Display

Choosing the area to mount a Fishfinder is always difficult, on the Prowler it was even harder. We would normally have chosen to fit it in the area where the second cup holder is placed, but this was not possible.
The alternative was to mount the display and base at the rear of the flat area used to hold a tackle box on the Angler version of the Prowler 13. This has actually worked out quite well, the display is easily accessible from the seated position and still leaves room for a cutting board when baiting up.
Installing the Finder
Firstly remove the elastic tackle box strap and associated fittings, this will give you a nice flat area to mount the display. With the base pushed against the back of the recess and centralised across the width, mark and drill the first hole using a 3/16" drill. Push the first M5 x 25mm counter sunk bolt through the base and into the newly drilled hole, then drill the diagonally opposing hole, for a good fit use the base as a guide, placing the drill bit into the hole to drill, but keeping a tight grip so that it doesn't move. Push fit the second bolt. This done, drill the last two holes again using the base as a guide. Using this method of drilling and bolting should give you a tight fit without any misalignment.
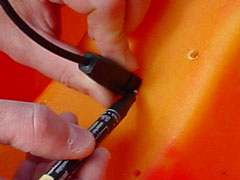
The next job is to fit the power and transducer cables. On the Humminbird models the transducer cable incorporates a single plastic plug, draw around this in the centre of the hole in the base, due to the shape of the plug, this will need careful cutting and filing to keep the hole as small as possible, you could of course fit a rubber grommet to give a good seal.
Having already removed the base to drill and cut the cable hole, use a sharp craft knife or sandpaper to clean up all the holes.
Add a blob of Loctite 595 sealant to each of the bolt holes, then bolt the base into position, using the Prowler's hatch for access.
Pass the Transducer plug up through the hole and Power lead down through the cable hole. Using the supplied fittings position and screw the power and Transducer Cables on the Mount. Push the Display mount backwards to stretch the cables up through the hole. Place masking tape on the inside of the hull to cover the cable hole, now squeeze a large amount of Sealant into the recesses from above ensuring that the hole is well covered. Allow the sealant to dry for 24 hours and then carefully remove the masking tape.
Fitting the transducer
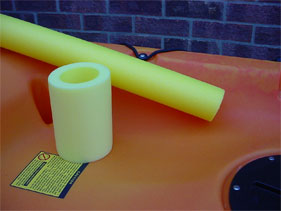
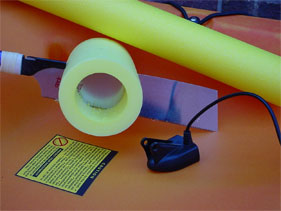
Although we have had no problems with the Caper's Transducer, it was decided to mount the Prowlers in a less permanent way, using a swimming noodle, a noodle connector and a couple of jars of vaseline.
We chose to fit the transducer underneath the forward cup holder, making it easy to access from the main hatch.
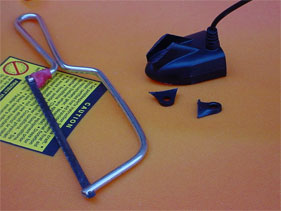
First job is to cut off the two plastic brackets on the top of the transducer using a hacksaw. These were deemed a little high and could cause the transducer to move out of alignment with the hull.
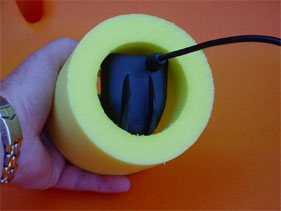
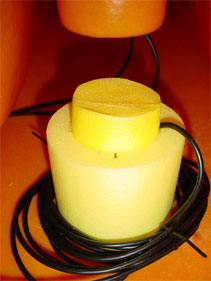
Placing the transducer on a flat surface, mark the noodle connector for cutting, we cut it to a length of 10 cm.
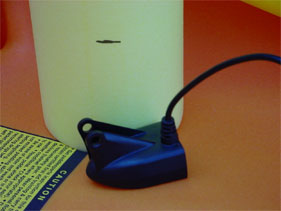
Mark the front of the noodle connector with a pen, then using a coarse grade glass paper, shape the bottom of the noodle connector to fit snuggly on the inside of the hull. Ensure the mark on the front of the noodle connector aligns with centre of the hull. Rough the area chosen for fitting the transducer, wipe the area with white spirit until no more colour appears on the wipe.
Slide the transducer into the noodle connector from the top and position the front of the transducer (the pointed end on the Humminbird transducer) using the mark on the front of the noodle connector as a guide, this needs to be accurate.
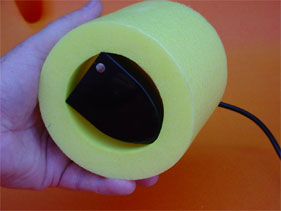
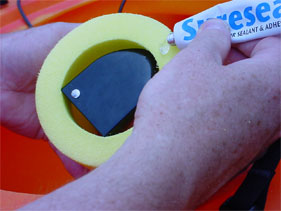
Squeeze a generous amount of Stormsure adhesive around the bottom of the foam on the noodle connector, make sure that none comes into contact with the transducer. Press the noodle connector into position, aligning the mark on the noodle connector with the centre of the kayak. Use a heavy weight to hold in position and leave for 24 hours.
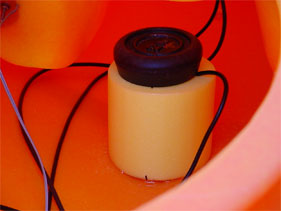
Place the vaseline into a cup of boiling water. Check that the transducer is flat against the hull. Carefully remove the jar from the boiling water, pour it's contents into the noodle connector, use a mixing stick to ensure that the vaseline is surrounding and covering the transducer evenly, taking care not to move the transducer, repeat the process with the second jar of vaseline.


Cut a 10 cm section of Noodle and slide into the connector sealing the vaseline and transducer inside.
Batteries and tidying up
You will now need to source your power unit, the battery. A Sealed Lead Acid battery is ideal for the job, they can be used at any angle and won't leak, they are available in a variety of sizes, voltage and current ratings to suit your needs. We chose a 12 volt, 3.3 Ah from Maplin the electrical store, where we were also able to buy a matching two stage charger. It's worth noting that the chargers are rated for particular battery capacities, so if you decide you need more capacity chances are you will also need to buy a new charger. The 3.3 Ah battery gives a good couple of days fishing before needing a recharge and isn't too heavy.
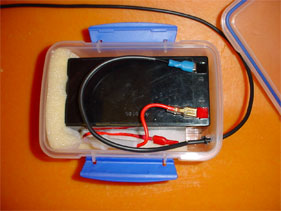
We used an Otterbox in the Caper and but found it difficult to open with cold hands. So the search was on to find an alternative for the Prowler, a Klip-It 1 litre airtight box was found in the local hardware shop at a cost of £2.89, the 3.3 Ah battery fits in beautifully. We added a little foam to two of the sides to allow a snug fit. The lid is secured with a large lock tab on either side.
Before fitting the box drill a small hole at one end of the box, just below the lid to accommodate the power cable. Sand and clean the hull in a central area beneath the hatch. Lightly sand the base and edges of the Klip-It box, glue into position using Stormsure Adhesive.
Place the battery into the box and leave to dry for 24 hours.
Push the power cable through the hole in the box, then add an inline fuse holder with the correct fuse for your finder to the positive (red) cable, crimp on battery connectors to the black and red leads. Add a small cable tie to both sides of the cable to hold in place where it fits through the hole in the box and add a little sealant or glue to ensure a water tight fit. The electrical fittings are all available from Maplin.
When you have finished you are left with a lot of power and transducer cable to tidy, wind it in loops around the noodle connector and tie loops together with a couple of cable ties.
Connect your battery and turn onyour display, your ready to go.
Alternatively the battery and leads can be rolled up in a dry bag and placed inside the hatch.
Disclaimer:
Installing hardware may cause damage and/or void manufacturer warranties.
The information we provide is a free reference guide only. The author of this information, sponsors and the owners of the website that host this information are not liable for any problems or issues that arise from the use of this information. Users of this information hereby acknowledge that all use of this information is done by their own free will, at their own sole risk, understanding that injury or death could occur.