Rod building how hard can it be?
Have been tying flies for a couple of years now, although I'm not always sure what I'm doing it's very satisfying.
My first Bass caught on the fly was all the more satisfying as it was on a home tied fly, the fly was a Crystal Schminnow.
Being able to tie a few flies gives you certain skills, similar skills are required in rod building, whipping, the use of epoxy and a bucket full of patience. Building your own rod not only gives you an enormous amount of enjoyment and satisfaction, but every fish caught on that rod is all the more special.
How much will it cost. Rods can be built for as little as £30, prices rising to £400+.
The hardest part of the process is choosing a blank. Either play safe and choose from a well known manufacturer, Sage Xi2 and the G.Loomis GLX blanks are both available if you want something special, alternatively do some research on the rod building forums to find that bargain blank, an unknown that is proving to be something special.
I chose to purchase a cheap 6.5ft, 2wt for my son 6 year old son, it was available as a kit with all the glues and whip finishing required to build several rods, and a G.Loomis IMX 9ft 8wt for myself.
The G.Loomis GLX has become available since my purchase, but is considerably more expensive. The 8wt came with a free fitting kit consisting of preformed cork handle (requiring reaming to fit the blank) a set of tungsten guides, hook keeper, winding check, reel seat and fighting butt.
Having previously owned a rod with a reel seat that required frequent tightening, I decided to order a Struble U-15 reel seat, the Struble was a safe bet as Struble make some of the finest reel seats in the world.
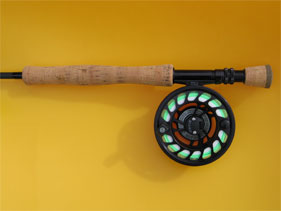
From start to finish the IMX took four evenings to build, 2-3 hours spent each evening. The quality of finish is as good as those commercially available but without the decorative whippings, it feels very well balanced and suits my style perfectly.
I'm not going to explain how to build a rod, there are plenty of sites to help with that some which I will list below. But I do have a few points that may help.
- When ordering, don't forget to buy a protective case to match the rod.
- It's worth buying two cork handles, the quality differs so much with cork. One handle may be better than the other and the preformed handles are very cheap if bought from the States.
- Reaming the cork handle was the most painful part of the process, hence the need for the second cork handle.
- You will need to buy tapered reaming tool. Before commencing ensure that the glass paper is fitted well. Wear gloves if your reamer is made of fibreglass, the fibres do come off and they hurt like hell.
- Check several websites for the guide spacings, some rod builders have strange ideas about spacing. Alternatively take the spacings from another rod of the same length with the same number of guides, measure from centre of eye to centre of eye.
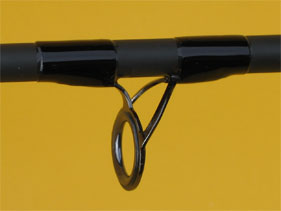
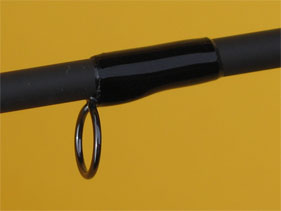
- Glue the tip ring in place first, don't use epoxy you may need to replace it during the rods lifetime.
- Check all the guides feet, file any burrs and lay on the blank to ensure they sit nicely.
- If using single leg guides attach them with a little bit of Superglue, check the alignment as you add each guide, they will take a little time to glue so you do have time to move if wrong, also check they are not twisted across the blank.
- Use a piece of card cut to the width of the whipping required for the largest guide, use to measure all the whippings, all guides should have the same width whipping to give a neat finish.
- If your not happy with any of the whippings, cut them off and redo, it will be quicker the second time.
- Ensure that you are happy with the look before coating the whippings, double check the guide spacings.
- Read the Whip Finish instructions and be extremely careful when mixing, if not mixed correctly the finish will not dry properly.
- Cover a saucer in tin foil, pour on the mixed Whip Finish, it will dry slower on a larger surface, also makes cleaning up easier, just bin the foil.
- Use a flat brush to apply the Whip Finish, ensure the brush is cleaned and dried before using for the first time, a new brush is loaded with dust!
- When drying the whip finishing with an electric rod drying device ensure that everything is secure, if it falls, then the Whip Finish may end up covered in fluff, it happens!
Some helpful rod building and supply websites.
www.hookhack.com
www.flyfisherman.com/rodbuilding
www.rockymountainrodbuilding.com
www.rodbuilding.org/list.php?2
www.flyanglersonline.com/begin/graphite
www.rodbuildingforum.com
www.davidnorwich.com
http://shop.mudhole.com
www.reccomponents.com
www.tomwhite.com/INSTRUCTIONS.htm
www.gloomis.ru/tips_spacing_fly.htm
www.rodguild.com
So back to the question, rod building how hard can it be? Well it's not so why not give it a try.
David Morris