Fitting a Fish Finder
Gathering information at a new location can mean the difference between a successful or blank days fishing. If like me your hours fishing are balanced around family duties then you probably could do with a little help from a Fishfinder to gather that information.
As you may know fishfinders are not as the name suggests about just finding fish, they are used to paint a picture of the bottom of the sea, lake or river as you travel across the surface, showing any likely fish holding areas and yes the odd fish or two.
Before you buy your fishfinder take a trip to a chandlers, they usually have a few working in simulation mode, look at the detail on the screen, compare them, are they all waterproof, ask for a demo and have a play with them. If a permanent fixing is necessary can the display unit be removed when being transported. Do you have more than one kayak, would a portable unit be of more use.
Now you have made your purchase and before you get started drilling and gluing, get some fishing time in with your kayak and decide where you should locate the display, will your feet or legs interfere with its operation, where are you going to put that 8 lb Bass, or hat trick of Mackerel, is the line going to continually wrap itself around the display unit when unhooking or changing bait. Work out where your rods are going to be placed and at what angle when in their rod holders. Are you going to be able to turn and sit side saddle easily, will the unit get knocked about when launching and landing, where are the transducer and battery going to fit.
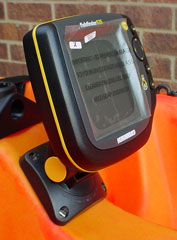
The fishfinder that I chose to fit is the Humminbird Fishfinder 535, it has a large detailed display which is easily removed from the power/base unit for transportation, the transducer supplied with the unit can be fitted to shoot through the hull which is necessary with this type of installation.
Fitting the transducer
Having decided on location, the first item to fit is the transducer as this will take the longest to glue. I chose to locate my transducer under the seat, I have easy access to it via the hatch fitted earlier in this project and it is well away from the forward hatch where I tuck my rods when returning to the beach through surf. Make sure that you read your installation instructions before fixing so that you know which way round the transducer must face.
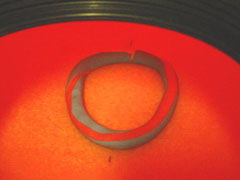
Rough up the area where the transducer is going to be located with some 80 grit sand paper and then clean the area with Methylated Spirits and a clean cloth, keep folding the cloth until no more colour comes off on the material. Mark a couple of dots on the roughened area centrally one behind the other to give a visual reference when locating the transducer. Using some plasticine roll a nice long sausage large enough to go around the transducer plus 25mm extra space all round. Put the plasticine ring into position inside the hull.
On to mixing your adhesive. As most of the adhesives suggested on the American sites are unavailable in the UK, I decided to find something available over here. I tested several types on the piece of deck that I removed when fitting the hatch out of these I chose to use 'Devcon 2 Ton Epoxy' it bonds well, sets clear and with few bubbles with the bonus of extra working time. Please test before using, as epoxy gets incredibly hot as it cures, the larger the quantity mixed, the hotter it will get, you could end up with a very large hole in your hull, if in doubt check with your kayak's manufacturer.
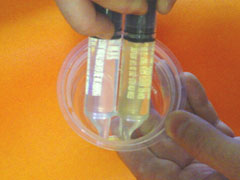
As shown in the picture slowly squeeze the epoxy into a shallow pot, whilst turning the pot and stirring thoroughly with the nozzles, try to get as few bubbles in the mix as possible. I used about 75% of both tubes. Pour the mix into the plasticine circle and allow to stand for 10 minutes, no longer, this should allow time for the bubbles to surface and pop. Press the transducer into the epoxy starting at the back and rocking forward to expel any bubbles from between the transducer and hull, twist a couple of times and align it in its final position, the plasticine will stop the epoxy spreading around the inside of the hull and make a nice deep puddle around the transducer.
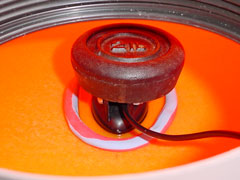
Place a heavy weight on top of the transducer to help maintain its position. Leave for 24 hours.
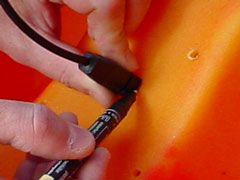
Finally run the transducer cable up forward towards the display unit, I ran mine behind the scupper mouldings.
Mounting the Display
Position the base in it's chosen position, having already checked that it is not blocking access to your rods, that you have access to the inside of the hull where you will need to fit the locknuts and washers and feed any cables. Mark the first hole and using the correct drill bit, slowly make the first hole. I held the base tightly in position and drilled using the hole in the base as a guide. Put in your first bolt, check the base is still level and drill the opposite hole, using the hole in base as a guide and fit bolt, do the same for the last two holes.
Mark the hull in the centre of the base or where your cables need to come through. You can either drill a hole to accommodate a rubber grommet and place the leads through the grommet, or drill a hole for the largest lead, and then once both leads are fitted build up the hole with sealant adhesive. I used the later method using Loctite 595 to seal the hole, having already sealed each bolt hole with the Loctite 595 and tightened all 4 nuts and positioned the cables in the holder correctly.

Batteries and tidying up
You will now need to source your power unit the battery. A Sealed Lead Acid battery is ideal for the job, they can be used at any angle and won't leak, they are available in a variety of sizes, voltage and current ratings to suit our needs. I chose a 12 volt 3.3 Ah from my local Maplin electrical store, where I was also able to buy a matching two stage charger. It's worth noting that the chargers are rated for certain battery capacities, so if you decide you need more capacity chances are you will also need to buy a new charger. The battery gives me a good days fishing before needing a recharge and isn't to heavy.
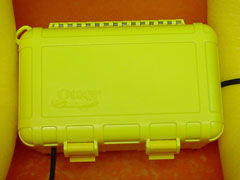
Because the battery is about the weight of a brick I didn't want it flying around inside my hull, so with a bit of surfing on the web I was able to find a waterproof box which the battery fits in perfectly allowing room for cables and fuse holder. It's made by Otterbox and are available from www.robinhoodwatersports.co.uk
Alternatively the battery and leads can be rolled up in a dry bag and placed inside the hatch.
I routed the cables around the scupper mouldings and used a swimming woggle to hold in place plus a cable tie around the forward scupper moulding and cables. (Swimming woggles give you a little more flotation, should you swamp the hull when your hatch is open.) I also forced a section of woggle across the kayak, fixing a cable tie around its middle, after sanding the hull I glued the cable tie to the hull with Stormsure, which is a great adhesive but a little runny and sets with hundreds of tiny bubbles. I then drilled a hole in the side of the Otterbox to accept the powercable, a tight fit is needed to help stop any water getting in. The power cable was passed through the hole and an in-line fuse was added as recommended by Humminbird. The Otterbox was then glued centrally to the hull using Stormsure, having already sanded the hull and box base. The battery was left inside the box until the glue had cured. I ran some more glue down either side of the box to give a more secure fixing.

A second section of woggle was then fitted across the hull sandwiching the box between the first section.
I added a small cable tie to the power cable inside the box to stop the cable pulling out and put a little sealant around the outside of the hole.
Connect your battery and turn your display unit on, your ready to go.
Disclaimer:
Installing hardware may cause damage and/or void manufacturer warranties. The information we provide is a free reference guide only. The author of this information, sponsors and the owners of the website that host this information are not liable for any problems or issues that arise from the use of this information. Users of this information hereby acknowledge that all use of this information is done by their own free will, at their own sole risk, understanding that injury or death could occur.